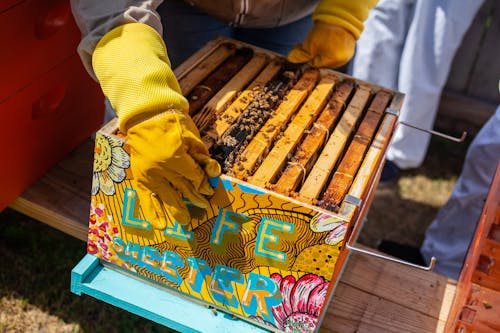
If you’ve ever dreamed of producing your own honey, boosting your garden, and becoming more self-reliant, building a DIY beehive is one of the smartest prepper projects you can take on. You don’t need acres of land or expensive gear—just a small backyard, basic tools, and a plan.
This guide walks you through everything you need to know to build a backyard beehive, maintain it, and keep your bees thriving year after year.
🧭 Why Build a DIY Beehive?
A backyard beehive isn’t just a hobby—it’s a step toward survival independence.
Here’s what makes it such a powerful prepper asset:
1. Honey Production
Honey never spoils, stores indefinitely, and provides both calories and natural medicine. From energy to wound care, your hive becomes a renewable food and first-aid source.
2. Pollination Power
Bees improve your garden yields dramatically. Your fruits, vegetables, and herbs will thrive thanks to increased pollination.
3. Wax and Byproducts
Beeswax is a prepper’s secret weapon. Use it to make candles, waterproof containers, or natural balms and salves.
4. Self-Reliance
A DIY beehive cuts dependence on store-bought goods and gives you control over your food supply.
5. Urban Friendly
Even a small urban yard—or a rooftop—can host a compact beehive setup. Perfect for apartment preppers or small-space gardeners.
🧰 Materials You’ll Need for Your Backyard Beehive
Before you begin, gather these essential materials. Many can be sourced locally or from online suppliers like Mann Lake, Betterbee, or Home Depot.
For the Hive:
- Wooden hive body or deep boxes (Langstroth or top-bar design)
- Frames and foundation sheets (wax or plastic)
- Inner cover and telescoping outer cover
- Bottom board and entrance reducer
- Nails, screws, and non-toxic wood glue
- Weatherproof paint or sealant
For the Beekeeper:
- Beekeeper suit or veil and gloves
- Smoker and hive tool
- Bee brush
- Feeder (optional during startup)
Bonus Prepper Add-Ons:
- Solar wax melter (DIY build possible)
- Mason jars or airtight containers for honey storage
- Labeling kit for trade or bartering
🏗️ How to Build a DIY Beehive Step-by-Step
Step 1: Choose Your Hive Design
There are three main DIY beehive styles:
- Langstroth Hive: The most common. Uses removable frames stacked vertically—great for beginners.
- Top-Bar Hive: Horizontal and easier to inspect; popular for small spaces.
- Warre Hive: Compact, self-sustaining, and requires minimal maintenance.
➡️ Preppers often prefer the Langstroth for scalability and spare part availability.
Step 2: Cut and Assemble Your Hive Body
Use untreated pine or cedar. Assemble your boxes with screws or nails and reinforce joints with glue. Avoid pressure-treated wood—it’s toxic to bees.
Seal the exterior with eco-friendly weatherproof paint or linseed oil. Leave the interior unpainted to preserve natural ventilation.
Step 3: Install Frames and Foundation
Insert your frames evenly, ensuring proper spacing. The foundation sheets will guide the bees to build straight, uniform combs.
Tip: Rub a little beeswax on the frames to encourage quicker colony growth.
Step 4: Add Entrance and Ventilation
Bees regulate their hive’s airflow, but your design should include small upper vents to prevent condensation.
Entrance reducers help protect against robbing bees, wasps, and small predators.
Step 5: Secure the Roof
A telescoping lid with a metal top protects from rain and snow. If you’re in a high-wind area, use bungee cords or bricks for extra stability.
🌸 Setting Up Your DIY Beehive in the Backyard
Pick the Right Location
- Sunlight: Morning sun is crucial to warm the hive early.
- Wind: Shield it with fencing, shrubs, or a small barrier.
- Water: Bees need a nearby water source—set up a shallow pan with pebbles.
- Neighbors: Keep hives at least 10 feet from property lines and point entrances away from walkways.
Install Your Bees
You can buy a nucleus colony (“nuc”) or package bees from local suppliers.
Install them gently in the evening, using light smoke to calm them. Within days, your queen will begin laying and your workers will start building comb.
🐝 Maintaining and Managing Your Beehive
Regular Inspections
Inspect every 7–10 days in spring and summer:
- Check for eggs and brood pattern (sign of a healthy queen)
- Watch for pests (mites, beetles)
- Ensure adequate space for honey buildup
Feeding Bees (When Necessary)
If nectar is scarce or during startup, supplement with sugar syrup (1:1 water:sugar). Stop once they’re actively foraging.
Seasonal Care
- Spring: Add boxes as colonies expand.
- Summer: Harvest honey once frames are capped.
- Fall: Reduce entrances, check food stores, and prepare for winter.
- Winter: Insulate lightly, ventilate, and avoid disturbing them.
🍯 How to Harvest Honey from a DIY Beehive
When most combs are capped, it’s time to collect your reward.
- Smoke the hive lightly.
- Remove frames and gently brush bees off.
- Uncap honeycomb using a knife or roller.
- Extract with a manual or electric honey extractor.
- Filter and jar your honey immediately.
Store honey in glass jars in a cool, dark area. Properly sealed, it lasts forever—making it an ideal prepper food supply.
⚔️ Common DIY Beehive Problems (and How to Fix Them)
| Problem | Cause | Solution |
|---|---|---|
| Ants or pests | Spilled sugar or easy access | Apply cinnamon barrier or use hive stands |
| Mite infestations | Common in all colonies | Use screened bottom boards or natural treatments like oxalic acid vapor |
| Queen loss | Natural or swarming | Introduce a new queen or allow colony to requeen |
| Poor honey flow | Lack of forage or weather | Plant pollinator-friendly flowers nearby |
🌼 Best Plants to Grow Near Your Beehive
Enhance your bees’ success (and your garden) by planting these nectar-rich flowers:
- Clover
- Lavender
- Sunflowers
- Bee balm
- Mint and basil
- Wildflowers
- Fruit trees and berry bushes
🔧 Advanced Tips for Preppers and Homesteaders
- Build multiple hives for redundancy.
- Keep spare frames and wax for quick repairs.
- Use bee products for barter or trade in survival scenarios.
- Learn how to split a hive to double your colony count.
- Record inspections and honey yields for pattern tracking.
🧠 FAQ: Backyard DIY Beehive
Q: How long before I can harvest honey?
Usually after the first full season. Let the colony establish strong combs before the first harvest.
Q: Is beekeeping expensive?
A basic DIY beehive setup can be built for under $150 with reclaimed wood and beginner equipment.
Q: How many hives can I have in a backyard?
Most urban ordinances allow 1–3 hives. Check local regulations.
Q: What happens if I get stung?
Bees rarely sting unless threatened. Always move slowly, and wear proper protection.
Q: Is backyard beekeeping safe for kids and pets?
Yes, as long as hives are placed thoughtfully and not directly on play areas or paths.
🪴 The Prepper Payoff
Building a DIY backyard beehive gives you more than honey—it gives you control, resilience, and a deeper connection to nature. Each jar you harvest and each wax candle you craft becomes a symbol of your self-reliant mindset.
If you’re ready to start, grab some scrap wood, pick your hive design, and build something that will literally buzz with life.
🔗 Internal Links
- Backyard Survival Garden
- Prepping Skills Every Survivalist Should Know
- DIY Rainwater Collection System
🌎 External Links
- University of Minnesota – Bee Lab Resources
- Bee Culture Magazine – Beekeeping Basics
- Ready.gov – Sustainability and Self-Reliance
⚠️ Disclaimer
This content is for educational purposes only. Always check local beekeeping regulations and consult experienced beekeepers before introducing hives.
